Monday, June 30, 2014

Next at Home: Tour of Thailand: Practice Grill

So this whole course is known as Grill, three little bites that at the restaurant were served on a wood burning grill which is actually a very Japanese thing to do.  Needless to say, I don't have a table top grill that I can use, so I used an actual plate in my dish but I did grill these things outside.

So the hardest part about this dish was tracking down the chicken heart portion of the evening.  I considered mail ordering them but most of what I found was actually dog food.  Then I found that Tyson sold packages of hearts and gizzards.  Their website said Meijer which is where I usually shop so them, but no dice.  Saturday morning when I started this dish I finally broke down and went to WalMart which was also on the list.  Sure enough they had them along with a number of other nasty bits that I wouldn't have expected including beef tripe.  Needless to say, I will be frequenting Wally World for all my offal needs. 

Anyway, the first step for this bite was to prepare the cure for the hearts.  Sugar, pepper and salt.  I must also note that in an entire like 1 1/2 pound package of hearts and gizzards there were three hearts, that's it, fini.  Everything else was gizzards, of which I let the dog enjoy a couple, the rest I got rid of. 

So I mixed together the cure mixture and  put a bed of it down in a pan the put the hearts in and created a little curing dome.

From there the mixture went into the fridge to sit for six hours.

Once done I pulled them out of the cure and washed them off to get ready for the actual cooking part.

Then I vacuum sealed them to cook sous vide for about 4 hours.  It's funny, I bought my food saver 2 1/2 years ago, and I'm pretty sure I've never done anything but try and sous vide with it.  This despite the fact that I've read places that it doesn't work very well because the bags are designed for it.  Personally, I think the bags work fine, it's not having an immersion circulator that is the problem.  Without that wild swings in temperature are the issue which leads to over or under cooked food.

Anyway, from here the hearts sat in a 194 degree water bath for about 3 or 4 hours.  I didn't get a picture of the final product.

While the hearts were finishing up I started working on the squid.  That's a squid body, the recipe called for the tentacles, which upon further review would have been a better call, but they are so damn difficult to find and I didn't want to drive to Peoria to try and find them.  I probably will for the real thing. 

Either way, squid, fish sauce, palm sugar, lemon and Thai chile.  The whole mixture sat together for about an hour.


The final component was the strawberry.  A single strawberry and a bit of vegetable oil .

I cut the berry in half and seared it off in the oil until charred.


So from here I skewered the heart and squid and grilled them for approximately a minute.  This is the food ready to go onto the plate.


I finally skewered the strawberry and plated them up on my new long platters. 

Overall the heart was good, the strawberry was amazing, the squid was for some reason inedible.  This was why I think I need to actually find me some tentacles next time. 

We're moving right along on this journey and this week will be fun, provided I can find 15 hours of uninterrupted time to make this stock.


Thursday, June 26, 2014

Next at Home: Tour of Thailand: Practice Shrimp and Garlic

You're getting two for the price of one tonight.  I had always planned on doing these two dishes essentially together, one a bit more complex, this one much more simple and they use similar ingredients.  This dish is essentially a shrimp ceviche with some Thai flavors.

The ingredients for the shrimp portion of the dish.  Palm sugar, fish sauce, salt, tomato, garlic, ginger, thai chile, lime and of course shrimp.  All the ingredients except for the shrimp got mixed together to make the marinade. 

So everything that was needed for the final plating.  The green in the lower right is a mint leaf.  From here I peeled and deveined the shrimp and put it in the marinade for two minutes, that's right two minutes.  I ate essentially a raw shrimp tonight.

So the final plating, the mint leaf went on bottom and was then topped with the shrimp which had been washed of any marinade debris the whole thing was then topped with a bit of the solids from the marinade.  Overall, probably my favorite bite of shrimp that I've had in a long long time. 

We're now getting into this menu full swing, I've got one more relatively easy course coming up that I should be able to finish this weekend, then the real fun begins.  I'll tease you now, pork belly and one of the spiciest dishes in the Thai repertoire.  Stay tuned.  


Next at Home: Tour of Thailand: Practice Prawn Cracker

So I'm falling a bit behind in this adventure but it's definitely not from lack of trying, it's disorganization.  In getting ready to make this dish I realized a little too late that despite the Asian population in my humble little burg, dried shrimp simply don't exist here.  I turned to the internet, specifically, amazon and found what I needed but it took a little longer than I thought to get here.  Overall this was a really simple dish, but there are certainly some kinks to work out.

So the first part of this dish started a day or so ago when I made the chili oil for a portion of the vinaigrette.  The recipe called for dried thai chiles, which are on their way from Thailand and they'll be here in about another two weeks.  But in the mean time I used the dried chiles I had on hand and a bit of vegetable oil.

The chiles went into the oil in the pan and fried for about 10 minutes.

Then everything took a spin in the blender until combined.

Now time to make the crackers, palm sugar, white pepper, club soda, jasmine rice, coriander, the infamous dried shrimp, egg and limes.  The first step was to turn the rice to a powder which I did with the spice grinder we got as a shower gift. 

Everything got mixed together until it formed this. 

I started the oil in a non-stick pan and put my version of a ring mold in (a screw top from a mason jar) and then spooned in the cracker mixture.  This is where the fine tuning comes in.  I put so much oil in that it sort of forced me to put more of the cracker mixture in which resulted in a patty, not a cracker.  Once the cracker had been seared off, I put it in the oven to dehydrate for a few hours.  The recipe called for 4 hours at 135, my oven only goes down to 170 so I was hoping for about 90 minutes at that temp.  However, given the thickness I went for about three hours.

While the cracker was drying I made the chili lime vinaigrette.  I took some of that chili oil from earlier along with lime juice and combined them.

The final plating, sloppy I know, the cracker was drizzled with a bit of the chili oil and garnished with a bit of lime zest.

I wish I would of had the proper thickness of the cracker.  The way I ended up doing this it was like a overdried fishy hamburger.  But, mistakes like this are why I'm practicing rather than going full bore into this. 


Saturday, June 14, 2014

Next at Home: Tour of Thailand: Practice Green Curry Buns

So time for the third bite of the first course of the menu and we have our first semiflop of this journey.  This is a steam bun, literally dough that is cooked by steaming filled with a mushroom and green curry mixture. 

I started by making the dough, flour, salt, sugar, baking powder, yeast, water and grape see oil.  The liquid plus the yeast got mixed together briefly in a mixing bowl while the rest of the dry ingredients got mixed together in a bowl.  Then everything combined in the mixer until a solid dough ball formed.  Then the whole mixture got set aside to rise for a couple of hours.

This is the completed dough.

Next it was time to work on the filling.  The green curry past included lemongrass, green onion, thai chile, shallot, garlic, basil, shrimp paste, galangal, green peppercorns, lime juice, fish sauce and coriander seeds.  Be sure to have some windows open with making this as the shrimp paste is POTENT!  I could smell the stuff before I even opened the box from Amazon.

The ingredients were all taken for a spin in the blender to make a paste.

Now it was time to finish the filing.  We have salt, coconut, the curry paste, lime and mushrooms.

I trimmed up the mushrooms and then sauteed them off in some canola oil.  Once cooked, the mushrooms were set aside for a couple minutes and then combined with the rest of the filling ingredients.

Now that the dough had had a chance to rise I rolled it out thinly and cut it into 3 inch rounds for the buns.

This is where the semi failure occurred, I couldn't get these little bastards to take a round shape with folds in them like the pictures and restaurants served them.  So this is what we ended up with with before going into my bamboo steamer for about 8 minutes.

Again, not at all what I was going for but all the awesomness was there.  Spicy, sweet, and sour all there and perfectly cut by the douginess of the bun.  I can't wait to actually get this right. 


Sunday, June 8, 2014

Next at Home: Tour of Thailand Practice: Northern Fermented Sausage

Hi everybody!  So over the past week I've been working on this second bite of the Tour of Thailand menu.  This one was a bit of a cluster because I had some issues tracking down a couple of the ingredients and my process for making the sausage needed some refining.  But overall, wow, it was really worth the effort.
Everything started last Sunday afternoon when I had a sausage making party for one.  This is about half a pound of pork shoulder and then some bacon.  The recipe called for pork belly which can be purchased online but getting one in now would be silly so I used bacon which is just pork belly that's been smoked.  I'll actually use a pork belly for the final show because there's another dish that uses it and I'll order one for that dish.

My mom has actually moved away from using a Kitchenaid mixer, which frankly I think is sacrilege, but it worked out because I have one and because of that I was given the sausage making kit.  So I busted that out and ground the meat, first through the large die and then through the small die.  This was the result.


With the meat ground you need to season it.  The seasonings for this sausage included salt, sugar, fish sauce, white pepper, ancho chile powder, cooked rice, garlic, bactofirm (Fermenting culture), pink salt, coriander and a bit of water.  All of these ingredients were folded into the pork and then I let the whole mix sit in the fridge until I was ready to stuff.

This is what the pork looked like after all the seasonings went in.


So what's a sausage without a casing.  I actually tracked down some natural hog casings so much so that the entire package I bought is enough for 100 pounds of meat.  I'm definitely not making that much but I've got plenty of casings for future sausage adventures.

From there I fired up the Kitchenaid again this time with the stuffing attachment and this was the result.  Pretty good for my first time making sausage don't you think?  This little adventure makes me want to continue to make more sausages but I also know why it's such a pain now too.

Now that the actual sausage was made we get to the fermenting part.  The fermenting is accomplished through a combination of the bactoferm that was added to the pork, the correct temperature and time.  Traditionally, in Thailand these sausages are just hung outside because of the temperature and humidity.  Here in Illinois the weather isn't consistent enough to pull that off.  So this time I used a crockpot to accomplish the job.  The problem was the wild swings in temperature (ideally this would sit at 90 degrees for five days) but I decided to pull it out after 2 1/2.  Next time I do this I'll rig up something else to try and maintain more consistency.

Fastforward to today.  I finally had all the ingredients (I had to order the galangal and chiles online at the last minute, otherwise I would have done this earlier) and the time to finish this sucker.

Don't know what happened to the ingredient picture but this is the relish which is a combination of ginger, galangal, peanuts, red Thai chiles, salt, peanuts, fish sauce and grape seed oil.  I took all the ingredients for a spin in a food processer and the picture above is the finished product.


Then I prepared the garnishes which went on the grill as well.

The sausage got grilled hot and fast just to basically warm through.

Then at the very end the green onion went onto the grill as well just to wilt a bit.

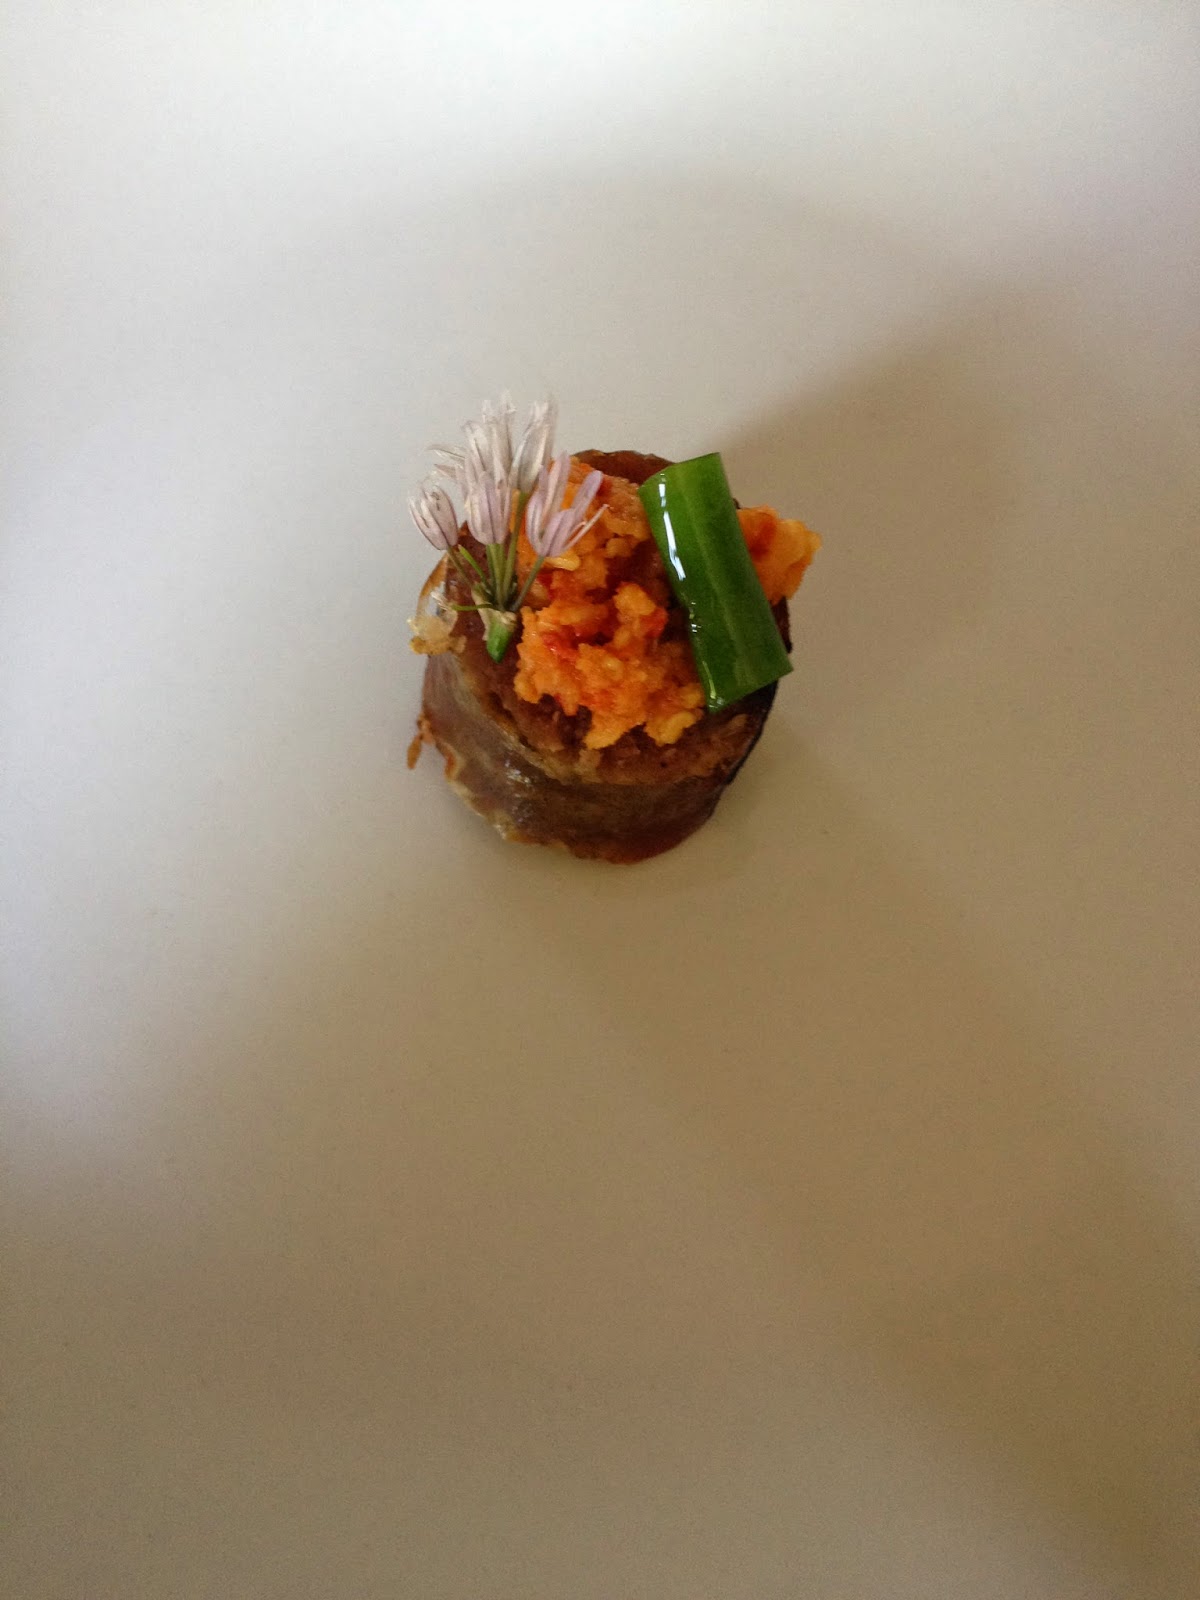
The final product.  I cut a bite size piece of sausage off the link, topped it with a couple small spoonfuls of the relish then garnished with a chive flower and green onion.

Honestly, throughout this whole process I was a bit scared of the sausage.  Sour and meat usually isn't a winning combination.  HOWEVAH!  This was amazing.

My sister-in-law is a Thai national so this process has a personal meaning to me.  In talking with her I found out that this style of sausage is my brother's favorite Thai dish and now I know why.